Wire Basics

 Tying knots in wire is a lot like tying knots in cord in higher gauges. That is to say when the wire is thin, it handles somewhat like cord. The most important factor with thin wire (also with thicker wire, but we’ll get into that later) is kinking. If your wire folds and pinches, those kinks in the wire will likely always be there. Straightening wire only works so well. Similarly if you end up making little bends in the wire those bends are exceedingly difficult to get out and leave ugly tool marks on the wire even if you do.

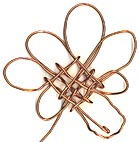
 So, the goal is to touch your wire a little as possible and move it into it’s final position when you do. To achieve this, you’ll want a jig (framework, template, tool) that guides the wire into it’s final shape (freehanding is usually a bad idea with wire knots) and use your pliers and hemostat only on the working end of your wire if you can manage it. The pliers help with guiding the wire into the knot as you are forming it, and the hemostat is good for pulling the wire through the knot. What you generally want to avoid (but is clear on the above mystic knot) is forcing the hemostat through your knot in an effort to grab the wire end and warping the heck out of the wires already in place. The missing tool that would have prevented this tragedy was the needle tool that was part of my workshop kit when I took a class from Loren Damewood.

The tool is fairly simple in construction: take a crewel or yarn needle and bend the tip slightly and put a blob of something (polymer clay, a cork, etc.) on the end for better grip and to prevent blunt end stabbing when applying force to the tool. Of course, as soon as I gave up searching for my tool and bought a collection of needles for experimental construction purposes, I found my whole kit along with my needle tool. The needle being steel is of sterner stuff than what you’re tying your knot out of (silver, copper, etc.) so it is more effective than trying to force the working end of your wire through your knot. Also the slightly bent tip allows it to navigate overs and unders with minimal distortion of the wires already in place. Finally being a needle (albeit large in the scheme of sewing needles) it is still smaller than just about any pliers, hemostat or other gripping tool to assist your wire on it’s desired path.
When I am tying certain knots in cord and frequently when teaching, I will use paper templates the guide the cord. Paper templates will obviously not help with wire, but I experimented for a while with plastic sheets recycled from random packaging with holes created with a sharp awl. The problem with my first round of experimentation was inexperience with wire. Not knowing how to most effectively apply force and interlacement methods. Lacking confidence and dishearted by the sharp and poke-y mess I was creating, I set things aside until I could attend one of Loren’s workshops. I highly recommend Loren’s workshops and if you can’t attend one, he’s also working on kits and instructional DVDs that you can order. Loren recommends and uses wood with nail jigs but to me, at least, this seems like a lot of work for rapid prototyping and experimental purposes, especially with the number of knots I might want to tie. Thinking on the problem and remembering how very firm a knot tied in nylon satin cord can be when tightened to an extreme degree, I thought: why not use a knot as a jig for a knot? As an added bonus, both the sizing of a properly tightened knot and the pattern of the knot in question (very useful for the more complicated knots) are already there. When you get towards the end of the knot and the wire and cord are crowding each other, simply untie the cord knot and remove it from the space in question (this can be done progressively as needs dictate). Voilà!